Pages

Wednesday, January 26, 2011

Mama's Tiered Skirt

I noticed, this morning, that I'm wearing a skirt that I made last spring and never took a photo of. 
I just had my daughter do the honors.
I wore this skirt to my sister's graduation.  My daddy said it looks too big for me.  I like it.  I asked if it looked too long and he just said, "it looks too big".  Maybe he's right.  I would appreciate any comments either way.  I did intentionally make it longer, because I like long dresses and skirts that I can have a picnic on the ground in, without showing private things.  I also like full skirts, so I added some fabric to the width too, but of course the waist is snug.  My daughter couldn't hold the camera up high enough to get my face in the photo.  She's 4.  I wasn't too thrilled about having my picture taken right now anyway.  I've still got bed head.


I used New Look pattern 6565.  Skirt A.  It's an *easy pattern.  I love easy projects.
This was just that.  I hope to make another one, this spring.

Tuesday, January 25, 2011

Car Seat Cover


With our first born we had a car seat cover very similar to this one.

 I don't know for sure, but I think I picked it up at a consignment shop.  It had a busted zipper, so I fixed it and used it with our 2nd child, then I gave it away.  We've been missing it, so I decided to make another one for our new baby.
I had some alpine fleece left over from some blankets I made for my sisters a while back, and this is what I decided to use.  This is my first tutorial.  Here it goes.....

What you need:  - Fabric of choice, enough to cover your carrier with a little extra allowance for your elastic casing.  My final cut was 36 inches long x 22 inches wide. 
- 37 inches of 1/4 inch elastic.
- Hook and Loop, zipper, snaps, or buttons.  (I'm using hook and loop, because I have a lot of it on hand.)


This is our infant car seat. (And my son who loves having his picture taken.)
And this is the alpine fleece I'm using for my project.  I didn't have enough pink to use for our baby girl's cover, so I'm using the pink and yellow scraps to make flowers to add to it.  And of course, Delsin dove down in time to get his face in the shot.

The first thing I did was lay my green fleece out and position the car seat upside down on top of the fabric. 
I then slid the carrier almost to the edge of the fabric.  I made sure to hold the edge up to where I wanted the edge of the cover to lay, then I added 1/2 inch to that for the elastic casing.  I used a permanent marker to mark where I will cut.


Next, I'm cutting out the flowers from my accent fabric. I like to use my cookie cutters for this process.


Now, pin the shapes onto your cover keeping in mind to leave plenty of room for the sides of the carrier to curve over the edge of the car seat.  Also make sure to leave room for your flap, where your baby's face will be exposed, when the flap is open.  I positioned one of the flowers to be on the flap.


I'm securing the flowers in the middle by sewing a circle in the center.  This way the flowers will be three dimensional.  Since fleece doesn't fray I don't have to worry about the edges.

Next, we need to sew the casing for the elastic. 
You want to turn over the 1/2 inch allowance you cut.  Or 1 inch as I did in some places.  The cover fits, so I'm not worried about it.  Be sure to leave a little gap at the end.  Just enough room to fit a safety pin, as you will be using that to thread your elastic through the casing.


Now you need to cut your elastic.  Delsin is demonstrating how I wrapped the elastic around the carrier stretching it to the way I wanted it to stretch when I put the cover on.  I ended up with 37 inches.  Not to tight and not loose.
Next, secure a safety pin to one end of your elastic and thread it through the casing on your cover.


Now we need to cut the flap.

I used a pencil because I don't have a water soluble marker, that I can find.  The pencil didn't actually make a mark, just a groove.  In the next photograph you can see that I used pins to mark my corners before cutting.

Now you cut the top and both sides of the flap, making sure to leave the bottom of the flap attached.

I measured my hook and loop to the width of the flap, leave a little extra to overlap the sides of the opening. 
Secure the hook portion on the underside of the top of the opening,
  with the hook facing outward.  You want the hook to face outward so that it won't accidentally scratch the baby.


Next, sew the loop tape to the underside of the flap, so that the loop is downward facing.  This way it lines up with the hook tape.


Voila!  All done!
It isn't airtight all the way around the flap.  If we lived in the Northern states I would be sure to put hook and loop all around the edges of the flap, but we live in the Southern states, so this is fine for now.
I got an action shot!  She loves it! (And this girl normally hates being in her car seat.)

 
Monday, January 24, 2011

A Bishop Dress Sew Along! Join Me!

I'm so excited and a little scared a the same time.  I've never smocked before.  I just bought a pattern from Pat Garretson.  She lives here in Georgia, in a town that I used to live in.  Smyrna.  I've been doing a lot of researching on smocking in the past week.   I came across some smocking patterns.  Pat's pattern caught my eye because it had so many variations in the photograph.  It also has bonnet patterns and my Kai loves to wear bonnets.  This is one we picked up at a consignment store.  I'm looking forward to making another one for her.  One to match her bishop dress.  She'll love that. 

So the many different styles of bishop dresses and matching bonnets, along with the many embroidery patterns too.  When I looked further and noticed it was written for beginners my hopes began to rise even more. The website I was on charged $8.00 for shipping.  I thought that sounded high for a pattern, so I decided to try ebay and etsy and google to see where else I might find a better deal.  That's when I found Pat's website. http://www.patgarretsonheirlooms.com/bishop%20pattern.htm Then, I noticed Smyrna, Ga.  I knew it was my choice.  I love to support locally whenever I can.  Not to mention, she only charges $5.00 in shipping.  Through my conversations with Ms. Garretson I've discovered that there are even more variations of dresses in this pattern than mentioned.  She said the pattern weighs 1/2 a pound and that is why the shipping is so high.  It's for beginners, so it's supposed to have really good instructions.  If not, there's always youtube.

As I began to check out I thought it wasn't going to charge me shipping, so I tried to call her phone number.  It was busy.  I tried it several more times, afraid to go ahead and not pay shipping.  I was also worried too that perhaps she had neglected her website, like I have neglected mine lately. 
When I finally got her on the phone I was so pleased to hear such a friendly voice on the other end of the line.  She was so helpful with my questions, and told me my shipping would be halved if I mailed in a check.  I wanted to use a gift card, so I paid through Paypal. 

I have decided to do this as a sew along.  I have no experience with smocking.  None at all.  I would like to start this project in two weeks.  Provided I have my pattern by then.  I'm extending this invitation to any one else that wants to take this journey with me and learn how to smock with me.  I'm going to upload pictures and or videos daily.  I have a strong feeling this is going to be a several day project.
I want to wait 2 weeks so that everyone who wants to has time to get your supplies.  Click the link above to get your Bishop and Bonnets pattern.
Saturday, January 22, 2011

Her Dedication Dress

Daniel called me from work last Friday afternoon.  "Debbie from Sunday school has called me and asked if we are going to participate in the dedication service Sunday morning, for Carolina Jane.  Do we want to do that?"

"I don't know.  What do you think?  I mean, we're already dedicated to raising her up to dedicate her life to Jesus Christ.  The ceremony is really just a public show.  I don't care if we do it or not.  We would have to buy her a dress."  I responded.

"We can go get her a dress tomorrow.  I don't want you to make it.  You stress me out when you don't have a lot of time to get a project like this done."

"Fine."
We spent the whole Saturday looking for dresses at various stores around this town and the next.  Finally, I said, "I don't see a single white dress anywhere.  I know I have some white fabric at home.  Let me just make it.  Please?"
Daniel agreed.  There wasn't much of anything to choose from.  The stores had been cleaned out from Christmas and hadn't gotten anymore shipments in, due to the dreadful 5 inches of snow we got the week before.  It was still very thick and slippery all over town.

So, at approximately 9 PM I got started on her dedication dress and worked through the night.  I went to bed at around 6 AM and got up for church two hours later.
I just used the same pattern I've been using for the past three months.


Dress A was the dress of choice.  I added 9 inches to the bottom of the pattern so that it would be a long dress instead of the shorter ones I had been making. 
I was almost crazy enough to attempt to convert it to a smocking pattern and attempt smocking for the very first time in my life.  Thank you God for whispering in my ear that it might not be the best idea.  I'm ordering a smocking pattern right now, for her Easter dress.

Organizing The Fabric Room

I've been needing to reorganize my fabric room and sewing areas for a long time now.  With the addition of our new baby girl and the aging of our current children we needed to make a room for the girls to move to.
This means reorganizing the fabric room and making it into the fabric room and the girl's bedroom.

Here are some before and after shots. I have the hardest time getting photos to post to my blog in the order I want them to be shown. So please excuse the mess, pun intended.
 In the above photo you can't even see how high I have things piled on the shelving system in the right corner.  I have a thread organizer on the wall on the left.
Below is a better demonstration of how much fabric and such is piled up on the floor.
There are several under bed storage containers full of fabric stacked up on top of each other here.  One with gift wrap and one with the kids' artwork are also piled up there too.
Home school stuff is on the shelf to the right. 
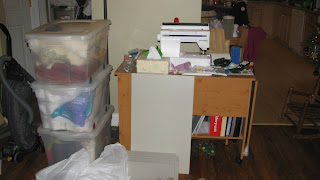
 Below is kind of an after photo, because these totes were actually in the main room, pictured above, before I started organizing.  My husband moved them to the living room, next to my sewing table.  I didn't take an after shot of this area, because it basically looks the same, only my sewing table is cleaner.
 Above you can see I have more totes full of fabric and poly fill.  (Wish I had realized I had all of that when I was cutting up old sheets as doll stuffing, last month.)

In the photo below this is a coat closet with totes full of more fabric, shipping supplies, and some office supply items.  These were originally in the main room too, before I started organizing.  I forgot to take the pictures until after I had already started.  Oh yeah, and quite a bit of Beauti Control make-up.  Brand new in the boxes.  If you wear it and want a good deal on something, try me first.

 Above is the view from the doorway, as you enter the room.  The white chifferobe is the only thing that isn't housing fabric or craft items.  But the top of it is stacked with fabric and craft items.  I didn't get a photo of that.  The plastic storage bins are loaded with such things, as well as the floor.  The far left corner is where I have large bolts of fabric. 


Below you can see my foam rubber and memory foam that are about to become dog beds.

 So we went to Ikea and bought these Malm drawer systems.
We bought two of them and stacked them on top of each other. 
I've organized my fabric that was in the totes and plastic bins, in this room, into these drawers, by type.
So all of my flannel is in one drawer, interfacing in another, fleece in another, and so on.
I took all of the fabric remnants out of the under bed boxes that were stacked on top of each other and I put separated them by type and filled 10 of the 12 plastic bins stacked on top of our Ikea dressers.  The remaining three bins have drawing utensils in one and paint and brushes in another.
The stack of 9 plastic drawers to the left house my notions.  I have one drawer full of hook and loop, one drawer full of elastic, one drawer full of ribbon, one drawer full of trim, two drawers that I have patterns stored in, a drawer for scrap booking items, and two drawers with various items such as zippers, hooks and eyes, snaps, needles, wax & molds for candle making, and glass for mosaics.  I still have lots of things piled up on top of the chifferobe. I still have a corner full of rolls of fabric and a few bolts stored on top of the plastic drawers.  All of them.  You can only see the tops of the ones on the left.
 So now, Kai says she has a real princess bed. She absolutely loves it. She inherited the under the bed boxes. We'll fill them with bedding and shoes, in time.


This is a not so great picture of another angle. You can see my thread organizer is till on the wall. That's fine, for now.