
Smitty got a new Elizabethan collar and I got to use my sewing machine for the first time in over 2 months!
Well, it's really not a huge celebration. We found out, last week, that Smitty has cancer. It hasn't spread to other areas, so we had the tumor on his chest removed. Last night we noticed that the stitches had ripped from one side. I took him back to the vet. today and was told that it would heal just fine if we leave it alone, or we could pay $80 something dollars to have him restitched. I opted to not spend the extra eighty something dollars, since the vet kept reassuring me it would be just fine if we left it alone.
Before we moved I thought we had two of these store-bought collars, but they couldn't be located. I have a feeling we gave one away and threw the other one away. Rather than driving 30 - 40 minutes to the nearest store that sells them, I decided it could be made and made much cuter if I just put my mind to it.
This is a tutorial, but it's also a documentation of my journey to figure out how to do it.
Materials:
- Paper for drawing your pattern on
- An idea of what size circle you want to draw. I used a sun visor as a guide for my own.
- 1 yard of vinyl
- 1 yard of a fabric for a liner. (If you choose to do one. Mine is not pictured in the below photo.)
- Pencil
- Scissors
- Touch Tape (A very strong type of hook and loop) Or snaps.
- Sewing machine and thread

The first thing I did was get out an over-sized sun visor that I had in my closet and try it on Smitty's neck to see how it would measure up.

Next, I laid the visor down on my paper and made a mark on the tip and traced the inner circle. I rotated it a little and repeated till I had enough marks to cut a complete outer circle and inner circle.
Notice that Smitty's mouth is able to reach the outside of this visor. That let me know that the visor isn't long enough and the collar won't be wide enough to keep him from licking his wound. Therefore, after I cut the first circle I folded it in quarters, folded another big enough piece of paper in half and cut a larger circle to make a larger pattern that would result in a larger collar.

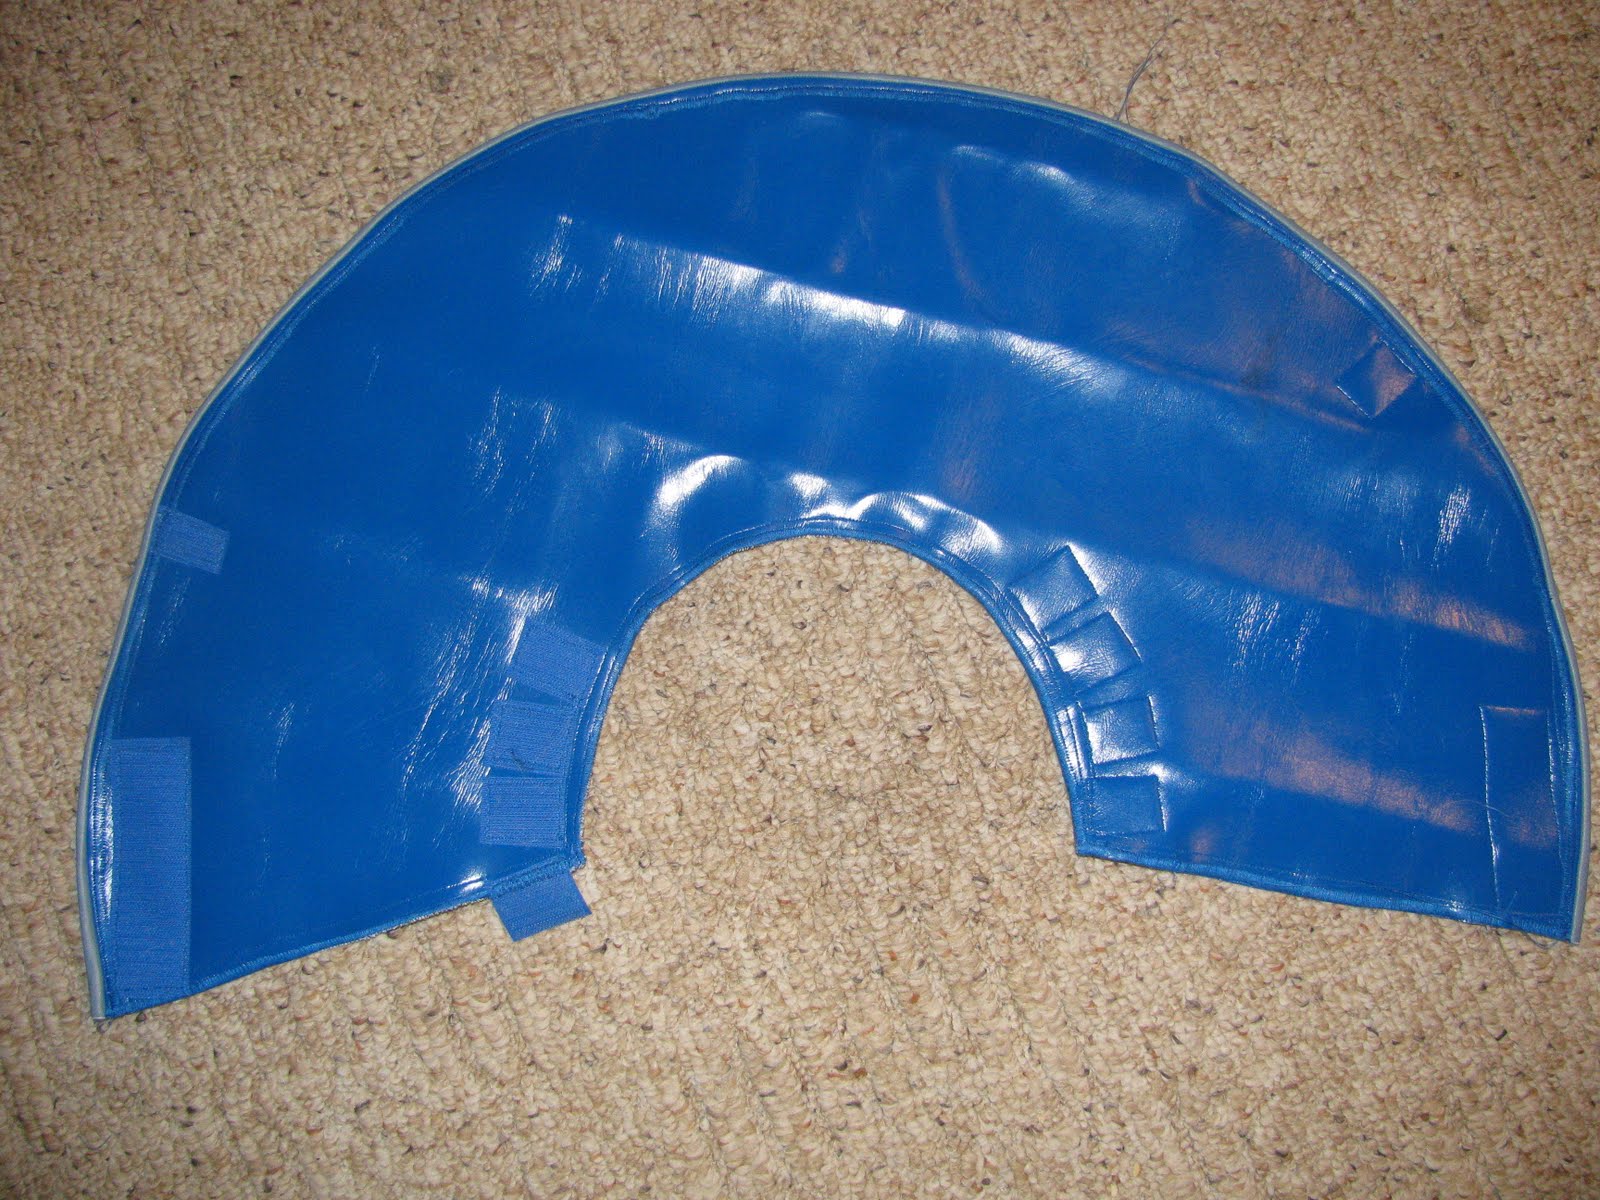
So, below you'll see my final pattern. It's just a half of a circle. I folded my vinyl in half, laid the straight edge on the fold and traced and cut. Looking back, I wish I had made a complete circle out of the paper, then cut it to the desired cone size I needed.


Then I cut a slit in the circle, so I could make it into a cone shape. I didn't have to cut so much fabric to waste if I had only made the desired cone size out of my paper pattern. I realized this too late, though.

So I cut to the appropriate size, and added my lining fabric to the back.


Here I am stitching around the edges, to hold the lining to the vinyl.
Next, I added the hook and loop. I cut it into 1.5 inch square pieces and placed them so that they would hug the curve of the stitch. You want to place the hook so that it faces outward and doesn't irritate your dog's body. The loop, of course, will then be able to face inward.

Here is a photo of how it's coming together so far. The edges are very flexible. Too flexible actually, because it would flop down and cover Smitty's eyes.

So, next I added the strip of gray vinyl to the edge to give it more rigidity. It measured approximately 1 inch wide and long enough to go around the outside and inside edges of the collar.
I put right sides together and stitched 1/8th of an inch from the edge, then folded it over and put a zig zag stitch on the back side edge.
(Sorry the photo is fussy, it's the best one I could get.)


Then put a zig zag stitch around the rest of the edges. I mentioned before to put trim on the inside edge. I didn't do this, at first. But my dog keeps sliding his collar off without undoing the hook and loop, so I'm adding it as soon as I finish typing up this tutorial.
Update: It's staying on just fine now. It just needed that extra bit of reinforcement on the neck to keep it from stretching, so I cut my trim like bias tape. In fact, he seems proud. He strutted all around the neighborhood this morning as if he were showing it off. My husband thinks he's like the kids, excited that Momma made something just for him. Knowing Smitty, I'd say he's right. He's definitely not giving us the sad eyes that he always has whenever he's had to wear those store bought plastic ones.
Update: It's staying on just fine now. It just needed that extra bit of reinforcement on the neck to keep it from stretching, so I cut my trim like bias tape. In fact, he seems proud. He strutted all around the neighborhood this morning as if he were showing it off. My husband thinks he's like the kids, excited that Momma made something just for him. Knowing Smitty, I'd say he's right. He's definitely not giving us the sad eyes that he always has whenever he's had to wear those store bought plastic ones.


Here he is eating.

These kind of post are always inspiring and I prefer to read quality content so I'm happy to find many good point here in the post, writing is simply great, thank you for the post.
ReplyDeleteThank you so much.
ReplyDeleteI've been searching high and low for this sort of tutorial! My dog has a surgery coming up in about two weeks and he's going to need to wear a cone for a while. Thanks for posting this =)
ReplyDeleteI'm glad Becca. I hope it worked out great for you. Let me know how your dog is doing.
ReplyDeleteI knew it could be done! I used a wide strip of heavy quilted black-out drapery lining that I had in my sewing closet and some left over heavy plastic. Covered it in some cheap fabric I had and used some left over binding from a quilt I made years ago. I even found Velcro in my sewing room and a strip of fake sheepskin to bind the neck with!
ReplyDeleteCost? Just a Sat morning Value? At least $25 ( if we bought the large plastic one at the pet store) and improved comfort for our pet! And really, mine is WAY cuter!
All in all a great project! Thank you so much for doing the hard part and posting your process online!
Cheryl in Bakersfield, CA
Awesome Nana! I don't know if you can post a picture in the comments or not, but please do if you can. It sounds cool. We just had to use ours again, as Smitty lost a fight with a one of those spinning fireworks sometime around the 4th of July. I was thinking it would have been better if I had added a wide piece of plastic in there. It's starting to flimsy up since I've washed it once or twice in the machine.
ReplyDeleteThis is very helpful. I was searching on Amazon for a similar one, and they are usually expensive and ugly. Now I can create my own for my special cat. Thanks!
ReplyDeleteThank you Trisha. I'm happy you found my blog.
ReplyDeleteThank you! I just made one for my dog in less than an hour! I wish I could upload a picture because he looks so cute!
ReplyDeleteOh that's great! Thank you so much for sharing! I love it when I have done something that can be helpful to someone else. I wish you could share a picture too! I'm going to have to see if there is a way to add that feature to the comments. I hope your dog gets well soon! Thanks again!
DeleteOm-gosh! I just came across your article and I must say found it entertaining as well as knowledgeable. Thank you! I am going to try this as I am so clueless when it comes to using my sewing machine! Lol....
ReplyDeleteJanet.
Om-gosh! I just came across your article and I must say found it entertaining as well as knowledgeable. Thank you! I am going to try this as I am so clueless when it comes to using my sewing machine! Lol....
ReplyDeleteJanet.
It would appear that the author has put a considerable measure of diligent work into this.
ReplyDeletebest-dog-carrier-backpacks-for-hiking
Thank you for sharing your process. My doodle will *not* stop licking at his scabs resulting in them not healing. The constant slurping sound also keeping me up at night. I think a DIY e-collar might be the ticket to a good night's sleep. Do you think I could add a stabilizer to the lining fabric to give it rigidity? Or will that structure wash out? I've never used a stablizer.
ReplyDeleteNice articles and your information valuable and good articles thanks for the sharing information Body belt for dogs
ReplyDelete